Table of Content
This document details on three key features of Famark framework namely site, handlers and reports. These features allow modification of presentation layer elements (user interface).
Each domain in Famark has a dedicated data store with data structure specific to the domain. Such domain can have multiple sites created that are mapped to the same data store but serving different user needs. This design allows users to register at any one of the site and access the different sites of the same domain with the same credentials as long as he has the necessary permissions. Effectively single-sign-on is enabled across different sites of a domain.
Entities related to presentation are all grouped in the foundation solution named UI. This document will elaborate on each of these entities and how they can be used to configure different UI elements.
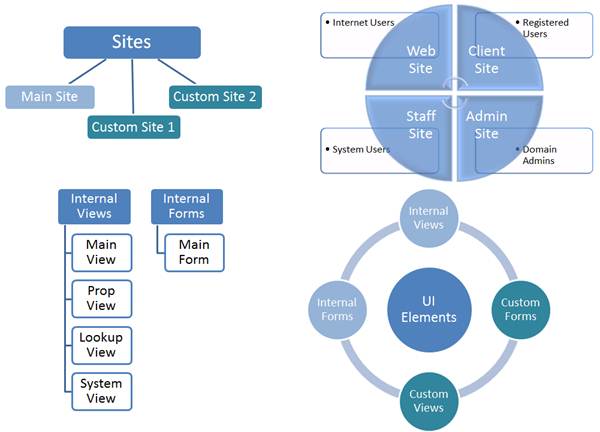
UI Setup Diagram
The above diagram shows a high-level architecture of user interface setup in Famark.
The three primary UI objects namely Sites, Views and Forms define how these objects will be rendered for the entities. There are certain internally defined UI objects that outline the default rendering, these include aMainSite that is available to each Famark domain and is the default site for administration, however all users in the domain can sign into it but will get access based on their permissions. Further by default four internal views namely MainView, PropView, LookupView and SystemView, and internal form named MainForm is automatically created for each entity.
All data access and actions possible in Famark are made available through web service API (both in REST and SOAP protocols); the presentation layer interacts with the same service to retrieve display information of a site and its contents.
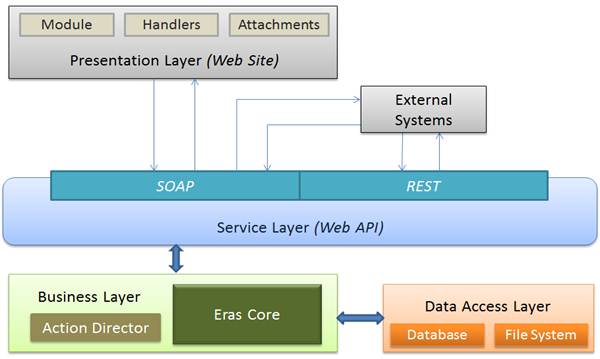
Famark Layered Architecture
The above diagram shows the different layers of Famark system with the three primary components at the presentation layer.
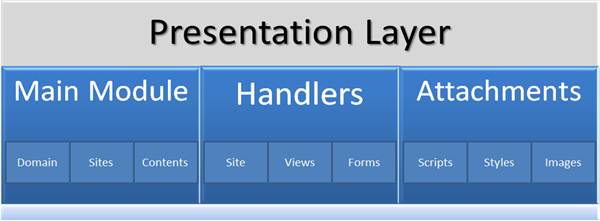
Presentation Layer Structure
The above diagram shows the presentation layer composition with Handlers responsible for rendering of different UI elements like, site, view, form,
etc.
The three primary components of the presentation layer are:-
(a) Main Module: Responsible for isolating the application context for each domain and mapping the site Url to the corresponding site. Further it allows accessing resources specific to the domain.
(b) Handlers: Responsible for rendering of all UI elements, sites, views, forms, etc. There are a total of sixteen handlers responsible for specific functionality available in the site.
(c) Attachments: Contains common resources, scripts, styles and images that are accessible to all domains and are utilized for default rendering of UI elements. However each domain can replace references to such common resources by their own specific styles or images.
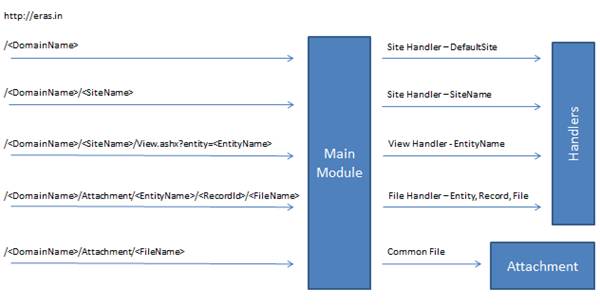
Main Module Diagram
The above diagram shows how the different requests are re-routed by the main module to appropriate handler. For example the file handler retrieves the attached file of a given record passed on the url format. By identifying the entity, record and the file name and returns back the content based on the file mime-type.
When the site name is not provided in the url then the default site is returned however if no site is configured as default then the internal site (Main Site) is treated as the default site.
Note: all handlers have an extension of .ashx and such requests are directly handled by the corresponding handler. Ex. View.ashx?entity=EntityName is handled by the view handler to show all records in the given entity. Similar to the view handler, request to form handler would be Form.ashx?entity=EntityName&rid=RecordId; such request will show a form for editing the corresponding record, if no rid is provided then the form opens in Add mode to allow adding of a record to the given entity.
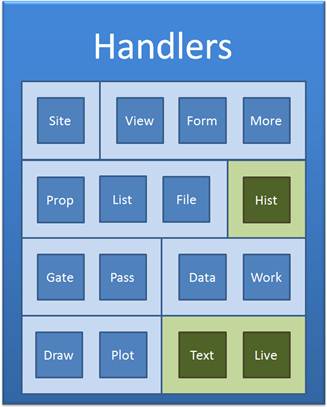
Sixteen Handlers Diagram
The above diagram shows the complete set of handlers present at the UI layer.
Note: the Hist, Text and Live are in development stage and will be available to business users.
Each of the sixteen handlers performs specific operation at the presentation layer. A brief description of each is listed below:-
|
Name |
Description |
|
Site |
Responsible for rendering the site with left navigation groups and links. |
|
View |
Responsible for rendering records of a particular entity in a tabular (grid) format. |
|
Form |
Responsible for rendering the form for a particular entity with which records of the given entity can be added or edited. |
|
More |
Provides option to perform actions on entities (records) apart from the standard actions (CRUD). Example Import/Export Data etc. |
|
Prop |
Shows properties and relations corresponding to a specific entity-record, including option to see attachments or history for that record. |
|
List |
Lists all the attachments of a selected entity-record. Further provides option to add or delete attachments of the record. |
|
File |
Streams files attached to an entity-record. Can allow downloading the file or renders it on the browser (if supported by the browser/device) |
|
Hist |
Displays history of the selected entity-record. Available for business user subscription. |
|
Gate |
Provides registration form or authentication from external identity providers. |
|
Pass |
Authorizes user based on user name and password provided by the user. |
|
Data |
Provides various ways to retrieve entity-records based on parameters passed to it. Extremely useful for all kinds of queries from script. |
|
Work |
Provides various ways to update or modify entity-data. All data manipulation done through scripts is handled by this handler. |
|
Draw |
Used for rendering images, example based on file extension, etc. |
|
Plot |
A very flexible handler that allows rendering content of any entity record that has attributes by the name of HTML, Script, Style, etc. Also used while rendering reports. |
|
Text |
A text editor handler that allows editing attached text files directly on the server. Available for business user subscription. |
|
Live |
Under research and development based on HTML5 specifications will support real-time streaming of media also allowing broadcasting. |
A detailed understanding of these handlers helps customize the user interface leveraging the inbuilt controls, instead of rebuilding them. Further the UI handlers are designed to be responsive that is they can adapt based on the device resolution.
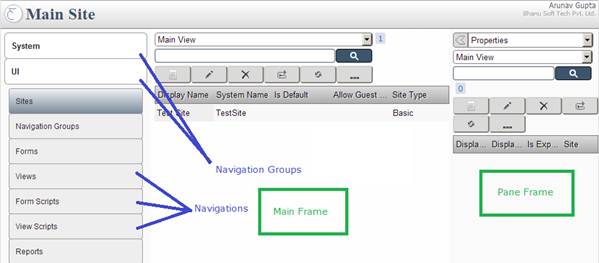
Main Site Screen:
The above screen shows the different parts of sites.
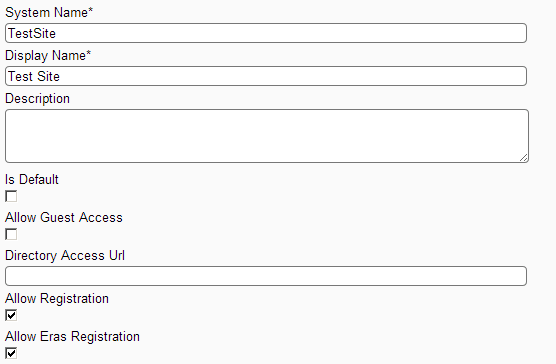
Site Fields
- System Name becomes the part of url for the site (also referred as SiteName).
- Display Name becomes the title for the site.
- Is default makes the site as the default site (note only one site can be marked as default).
- Allow guest access, allows not signed in users to visit the main site, if left unchecked the user will see a sign-in dialog before viewing contents of the site.
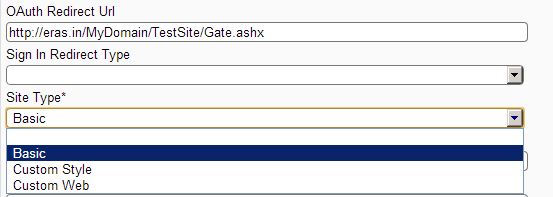
- If guest access is unchecked then authorization and registration option can be further provided to configure external identity provider, further sign in redirect type can be used when using a single external identity provider, in such case user is directly redirected to the identity provider instead of him/her choosing the identity provider.
- Site Type provides three different options for configuring a site, with Basic being the standard way for configuring different navigation groups and navigation links. Custom Style follows the same structure as Basic but also allows changing the css styles for the different UI handlers. Whereas Custom Web is designed to provide complete custom pages for the site, Import site content action can be used with Custom Web type sites.
- First Main Url and First Pane Url can be configured to show contents in the default main frame or the right pane frame when the user first signs in.
Site Form Screen
The above diagram shows the site screen with basic site type.
With Basic or Custom Style it is also necessary to configure the Navigation Groups and Navigations for that site as shown below:
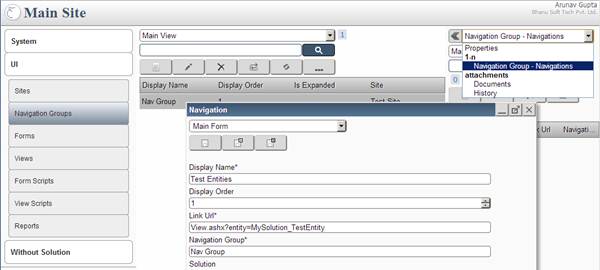
Navigation Group and Navigation (left pane) Screen
The above diagram shows how to configure Navigation Group and Navigation. Each site can have a number of navigation groups and every navigation group can have a number of navigations under it.
With Custom Styles type of site there is also an option to configure custom style sheets but the style sheet must be uploaded to web folder before it can be configured at the site. For reference the default style sheet can be download from the common Attachment folder through url https://www.famark.com/MyDomain/Attachment/Site.css, once modification are made to the css file, this custom css file can be uploaded as an attachment to a new Web Folder record.
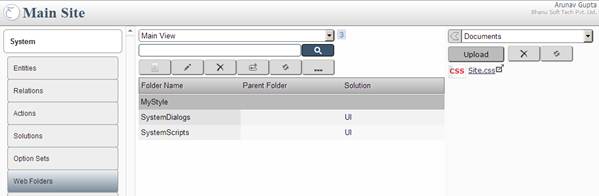
After uploading the style reopening the record of My Styles folder will show its url.
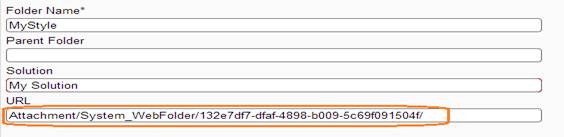
Prefixing the file name to this url gives the complete url to the file, copy this url to configure the site style.
Then configure the styles in the custom style site as
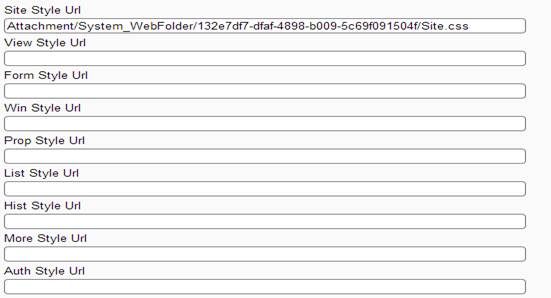
Similar to the Site style other UI css like View.css, Form.css, etc. can also be downloaded, modified, attached to My Styles web folder record and referred in the custom style site.
Custom Site
For public sites it might be desired to design a completely custom site with generic html, style sheets and scripts. For such requirement where it is essential to have custom html pages to be presented as a site and its content one can create a site of type Custom Web.
For a custom web type site all html pages and contents should be flattened and attached to the corresponding site record. In case the contents are organized in folders, then it can be zipped and imported using Import Site Content action which can automatically flatten the content updating the references in the files.
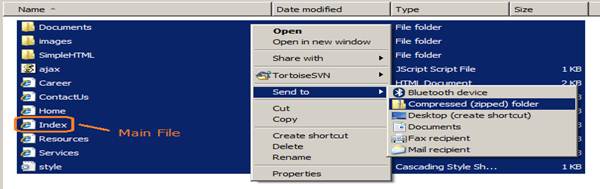
Compression Screen: The above screen shows how to compress and create a zip file.
Note: the main file of the site should be at the root of the folder being compressed.
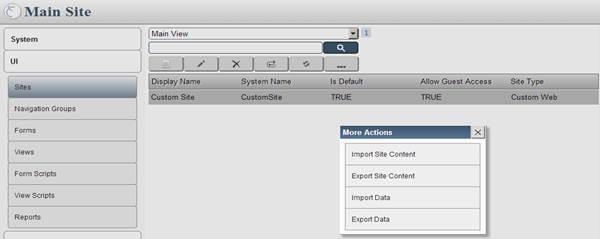
Import Site Content Screen:
Note: the site must be selected into which the contents are to be imported. Once the import is completed the Main File Name and the Main File References of the Site are updated in the selected site record.
Note: Main File Reference can be set to start with iframe if you want site url to show the attached main file in iframe. Otherwise you can also use @=site parameter while retrieving content from site through ajax.
The following list shows the different parameters accepted by the commonly used handlers:-
This handler is responsible for rendering the site with left navigation groups and links.
o Required Parameter: site= (System Name of the Site)
o Example: /Site.ashx?site=MainSite
This handler is responsible for rendering records of a particular entity in a tabular (grid) format. The view handler provides a number of optional parameters to control precisely the data or controls to be rendered on the page.
o Required Parameter: entity= (System Name of the Entity)
o Optional Parameters:
- mode=(Lookup/Related/Properties),
- view=(System Name of View or Internal View: MainView/ LookupView/PropView/SystemView),
- root=(HTML/Table/Div depending on parameter the complete HTML is returned or only the data in a table or div is returned, used in case of Ajax),
- search=(keyword to be searched),
- searchFields=(a comma separated list of columns (System name of Attributes) to search for the keyword),
- filter=(url encoded simple filter for filtering),
- orderBy=(column name for ordering),
- pageSize=(number of records per page),
- pageCount=(index of the page or page number),
- tools=(hidden or comma separated list of tools to display like selector, search, count, add, edit, del, prop, ref, more, header)
Example: /View.ashx?entity=System_Entity&pageSize=10&pageCount=0&tools=search,add&filter=DisplayName%3DA*
Note: DisplayName%3DA* is url encoded DisplayName=A* which means display name starting with A. Similarly multiple filter conditions can be specified like DisplayName=A*&SystemName=System_* which when url encoded becomes filter= DisplayName%3DA*%26SystemName%3DSystem_*
This handler is responsible for rendering the form for a particular entity with which records of the given entity can be added or edited.
o Required Parameter: entity= (System Name of the Entity)
o Optional Parameters:
- rid=(record id of the entity record to be edited, in edit mode else works in add mode),
- form=(System Name of the form or MainForm),
- preset=(attribute name =value pairs ),
- tools=(hidden or comma separated list of tools to display like selector, save, snew, sclose)
Example: /Form.ashx?entity=System_Entity&preset=DisplayName%3DTesting&tools=save
This handler shows properties and relations corresponding to a specific entity-record, including option to see attachments or history for that record.
o Required Parameter: entity= (System Name of the Entity)
o Optional Parameters:
- rid=(record id of the entity record selected while performing the action),
- filter=(url encoded simple filter if filter is applied to the view while performing the action)
Example: /More.ashx?entity=System_Entity&rid= A99C660C-0072-43B8-9CF6-D31974AE849D
This handler shows properties and relations corresponding to a specific entity-record, including option to see attachments or history for that record.
o Required Parameter: entity= (System Name of the Entity), rid=(record id of the entity record selected)
o Optional Parameters:
- tools=(selector/hidden)
- prop=(.properties/.documents/.history or system name of the relation as the default selected property option)
Example: /Prop.ashx?entity=System_Entity&rid= A99C660C-0072-43B8-9CF6-D31974AE849D&prop=.properties
This handler lists all the attachments of a selected entity-record. Further provides option to add or delete attachments of the record.
o Required Parameter: entity= (System Name of the Entity), rid=(record id of the entity record selected)
o Optional Parameters:
- tools=(hidden or upl,del,ref)
Example: /List.ashx?entity=System_Entity&rid= A99C660C-0072-43B8-9CF6-D31974AE849D&tools=upl,del
This handler streams files attached to an entity-record. Can allow downloading the file or renders it on the browser (if supported by the browser/device)
o Required Parameter: entity= (System Name of the Entity), rid=(record id of the entity record selected), file= (name of the file to be downloaded)
o Optional Parameters:
- type=(enforce alternate mime-type example application/octet-stream)
Example: /Attachment/File.ashx?entity=System_Entity&rid= A99C660C-0072-43B8-9CF6-D31974AE849D&file=myfilename.txt
Alternate mapped url: / Attachment/System_Entity/A99C660C-0072-43B8-9CF6-D31974AE849D/myfilename.txt
Note: file handler also supports http HEAD method, for streaming audio/video contents to allow browsers to request contents from middle. Example when slide is used while watching a video.
This handler provides various ways to retrieve entity-records based on parameters passed to it.
o Required Parameter: entity= (System Name of the Entity), columns=(comma separated list of attribute system names of the given entity)
For RetrieveRecord action (Single record)
o Required Parameter (In addition to entity and columns):
- rid=(id of the record to retrieved)
- sn=(system name if the record if the entity has an attribute by the name SystemName)
Note: either rid or sn parameter should be provided.
For RetrieveMultipleRecords action
When neither rid or sn or groupBy parameter is passed it is assumed to be a retrieve multiple records request. Note the following optional parameters can be passed with this request. Parameters entity and columns are still required.
o Optional Parameters:
- search=(keyword to be searched),
- filter=(url encoded simple filter for filtering),
- orderBy=(column name for ordering),
- pageSize=(number of records per page),
- pageCount=(index of the page or page number)
For RetrieveStats action
When groupBy parameter is provided In addition to entity and columns, then retrieve stats action is invoked. This action used while building reports.
o Required Parameter:
- groupBy=(attribute name based on which aggregation should be done)
o Optional Parameters:
- labels=(comma separated list of labels to replace column names in returned result)
- filter=(url encoded simple filter for filtering),
- orderBy=(column name for ordering),
- tzOffset=(when grouping done on datetime attribute then time zone offset in minutes to shift the result),
- dtPart=(when grouping done on datetime then further classify grouping as Date/Time/Day/Month/Year)
- interval=(when dtPart is Time then further grouping in intervals like 1H [for one hour], 2H [for two hours], 30M [for 30 minutes], 20S [for 20 seconds])
Note interval should be specified as integer value followed by time unit (H/M/S)
Example: Data.ashx?entity=System_Entity&groupBy=Get_Text_SolutionId&columns=Get_Count_System_EntityId&labels=No+of+Entities
This handler provides various ways to update or modify entity-data. All data manipulation done through scripts is handled by this handler. This handler works with http POST method.
o Required Parameter: entity= (System Name of the Entity), work=(action name for the action to be performed, ex. CreateRecord, UpdateRecord, DeleteRecord, etc)
o Optional Parameters:
Based on the work parameter additional parameters might be required
- data=(url encoded key value pairs for field and corresponding value, required in case of create or update record action)
- rid= (record id required in case of update or delete record, upload or delete attachment or any custom action that requires record id)
Note for actions that require file data (ex. upload attachment) a form contain input type file should be posted to the work handler. The name of the input element is used as the key parameter (in case of upload attachment it is FileData)
Example:
/Work.ashx
POST: entity=System_Entity&work=UpdateRecord&rid=A99C660C-0072-43B8-9CF6-D31974AE849D&data=DisplayName%3DTest%26SystemName%3DTestEntity
Note the data value is url encoded DisplayName=Test&SystemName=TestEntity
A very flexible handler that allows rendering content of any entity record that has attributes by the name of HTML, Script, Style, etc. Also used while rendering reports. The plot handler checks the entity for six fields DisplayName (to use as title), HTML, Style, Script, StyleUrl and ScriptUrl.
Based on the available fields in the entity the Plot handler renders html content.
o Required Parameter: entity= (System Name of the Entity), rid=(record id of the entity record), sn= (system name of the entity record in case rid is not provided and the entity has unique system name attribute)
Example: /Plot.ashx?entity=System_Entity&rid= A99C660C-0072-43B8-9CF6-D31974AE849D
Note plot handler is used for rendering of report charts.
Plot handler also works with http post when the six fields are posted to it.
Customization of an entity's view can be done in two ways, one by adding custom JavaScripts to the existing default view (Main View) or by configuring new views.
View Script allows adding custom JavaScript to the Views. Such custom view scripts can be triggered on load, on page change or on record delete of the view.
The following screen shows confirmation message while deleting a record of Report entity main view:
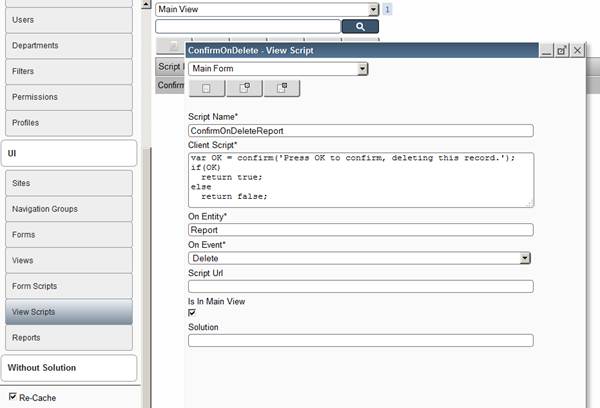
Note when the client script is large and can possibly be reused elsewhere then such script can be attached to any webfolder record as a js file and the url for that file can be entered in the Script Url field.
Further there are predefined functions in the View.js file included in every view that can be utilized to perform standard tasks on the view. The following list shows the functions present in the View.js that can be used in the custom JavaScript:
-
Famark.getViewInfo() returns an object of viewInfo with properties:
- viewInfo.viewMode (Main/Related/Prop/Lookup) returning the mode in which the view has been opened.
- viewInfo.entityName system name of the entity being shown in the view.
- viewInfo.viewName the system name of the view being shown.
- viewInfo.filter contains the simple filter string if a filter is currently applied to the view.
- Famark.getViewMode returns a string viewMode alone.
- Famark.setFormName(formName) sets the name of the form that should be opened by the view.
- Famark.setFormTools(formTools) sets the tools that should be shown with the form or simply set to "hidden" will hide all buttons on the form.
Besides using internal views (MainView, LookupView, PropView and SystemView) one can also create custom views configuring columns for the view with display formatting and data filter.
View Fields
- SystemName of the view.
- DisplayName of the view.
- The entity for which view is being created.
- View Field Names containing pipe separated list of Attribute Names to be shown in view.
- Order by Field Name containing the default Order by Attribute Name.
- View Type (Basic/Custom Style) basic allows default rendering in tabular format with default style, with Custom Style one can modify the Style css and also configure custom row format.
- View Style Url allows changing the default css style by upload a custom css file to a web folder. For reference the default style sheet can be downloaded from the common Attachment folder through url https://www.famark.com/MyDomain/Attachment/View.css, once modifications are made to the css file, this custom style sheet can be uploaded to a new Web Folder record with name such as My Styles. After uploading the style and reopen the My Styles folder record will show its url. Prefixing the file name to this url gives the complete url to the file, this complete url can be configured at the view style.
- Custom Row Format allows specifying html format for the row. The row can be wrapped in <tr> or <ul> tag. The row format should contain placeholders in html as (@AttributeName) to be replaced while rendering.
- Example: <ul><li><strong>(@DisplayName)</strong></li><li>(@SystemName)</li></ul>
- Allow HTML Value, when placeholders are replaced with corresponding value if the value itself contains html content then it is made to appear in text format, however if Allow HTML Value is checked then the html value is allowed to render as html.
- Filter can be configured to show filtered data in the view.
The following set of screen shows creating a filter for viewing entities which contains value in NN Relation field (Is Null with Is Not) and then creating a view with this filter and a custom format for displaying inbuilt system entity.
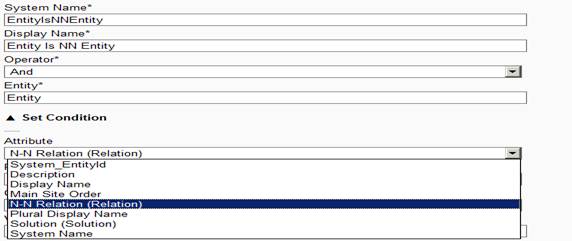
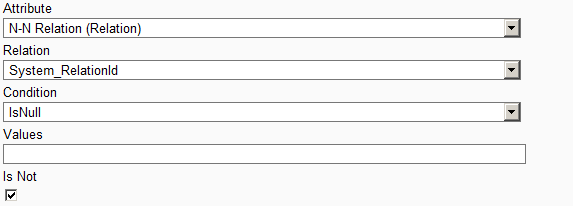
Filter Screen1
The above diagram shows the filter screen with list of attribute populated based on selected entity.
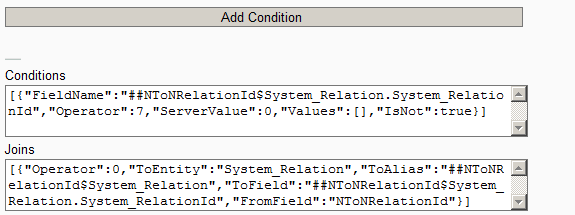
Filter Screen2
The above screen shows filter with Conditions and Joins auto configured when Add Condition is clicked. This filter can now be used with custom view on Entity to show only Entities which are NN Relation.
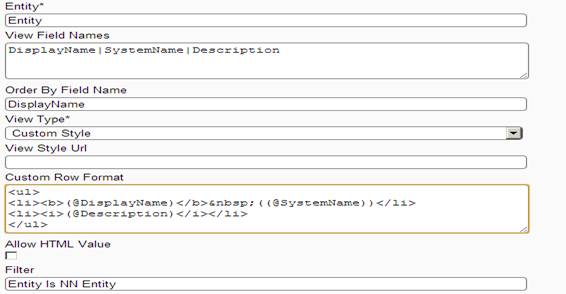
The following screen shows configuring View (NNEntities) with display name "NN Entities" with the above filter and showing columns DisplayName, SystemName and Description; with some custom formatting:
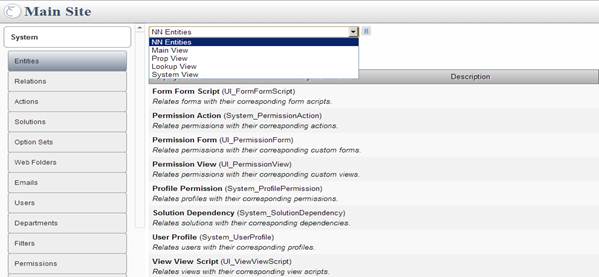
On selecting the NN Entities view we can see the view as seen below.
Similar to the entity's views, entity's forms can also be customized in two ways, either by adding custom JavaScripts to the default Main Form of the entity or creating new form for the entity. However with a library of script functions and responsive nature of default main form, customization through form scripts is the preferred choice for customization of form.
Form Script allows adding custom JavaScript to the Forms. Such Form Scripts can be configured to trigger on load, on field change or on save of the form.
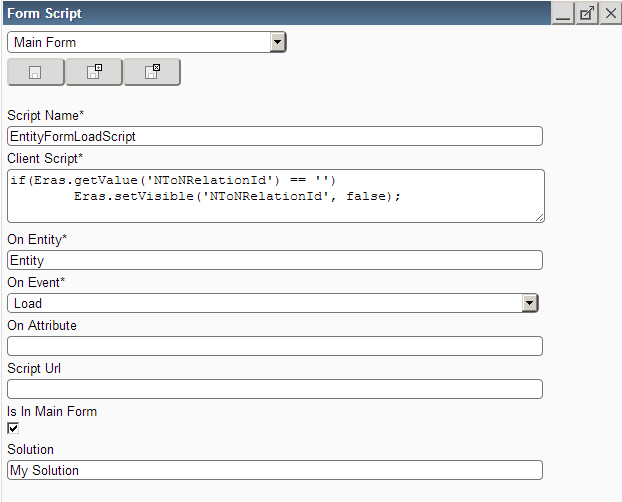
The above screen shows a form script added to the inbuilt system entity, which gets triggered when the entity form loads. This script checks if the value of field "NToNRelationId" of entity record is empty then the "NToNRelationField" is hidden.
Apart from scripts for getting value and hiding or disabling fields there are predefined functions in the Form.js file included in every form that can be utilized to perform more complex display actions on the form. The following list shows the functions present in the Form.js that can be used with custom JavaScript:
-
Famark.getFormInfo() returns an option of formInfo with properties:
- formInfo.formMode (ADD/EDIT)
- formInfo.entityName system name of the entity being added or edited in the form.
- formInfo.recordId id of the record being edited or null/empty when record being added.
- Famark.getFormMode() returns the formMode as a string "ADD" or "EDIT"
- Famark.setRequired(field, [true/false]): sets the field as required or otherwise.
- Famark.setFormat(field, format): sets the text format (regex) that should be matched.
- Famark.setValue(field, value, [modified: true/false]): sets the value to the field also optionally can pass whether it should be set as modified to be updated on save action.
- Famark.getValue(field) returns the value of the field.
- Famark.resetOptions(field) for select field clears the field and returns the select element to which options can be added.
- Famark.setDisabled(field, [true/false]): sets the field as disabled or enabled.
- Famark.setVisible(field, [true/false]): sets the visibility of the field.
-
Famark.setFilter(field, filter): sets a filter on the lookup field.
Example: EntityX has a lookup attribute named LookupYId that relates it to EntityY and EntityY has an attribute by the name AttributeY. Further EntityX form requires that LookupYId field only allows selection of EntityY records that have AttributeY with a value of MyVal. Then a form script on EntityX can be configured as Famark.setFilter("LookupYId", "AttributeY=MyVal");
Note multiple filters can also be configured as "Key1=Val1&Key2=Val2" filter format. -
Famark.setParentChildFilter(parentField, childField, filterKey): for two inter related lookup fields example Entity and Attribute. With parent child filter
when the parent lookup field value is changed the child lookup field reset with options based on the selected parent. The filterKey is the system name of
the attribute of the childField's entity based on which filtering should be done.
Example: EntityA is the parent entity and EntityB is the child entity with a lookup attribute by the name LookupAFromBId and another EntityC has two lookup fields one each for EntityA and EntityB, by the name LookupAId and LookupBId; for the form of EntityC that requires selection of LookupB filtered only for already selected LookupA value, a form script on EntityC should be configured as Famark.setParentChildFilter("LookupAId", "LookupBId", "LookupAFromBId"); where LookupAFromBId is the lookup attribute name of EntityB that relates it to EntityA. - Famark.insertField(key, label, value, type, pos): can be used to add custom display field to the form.
- Famark.removeField(field) : can be used to remove custom field.
- Famark.insertSection(key, label, fromField, toField, expanded): can be used to add collapsible section to the form.
- Famark.getFieldIndex(field): returns the index position of the field in the form, generally used to get relative position for inserting custom field.
- Famark.moveField(field, pos): changes the position of the field in the form placing it at the specified index (pos).
- Famark.setLabel(field, label): changes the label text of the given field.
- Famark.getColumnValues(entity, columns, filter): queries the server for the given entity requesting values for the given columns (comma seperated) and filter criteria as 'SomeField=SomeValue' and returns an array of values corresponding to the columns.
- Famark.getGroupColumnValues(entity, columns, groupBy, filter): queries the server for the given entity requesting values for the given aggregated columns (ex. 'Get_MAX_Field1,GET_COUNT_Field2') with grouping done based on the specified groupBy field. Optionally also allowing filter on data to be grouped.
- Famark.getDataOutput(url, len): returns value of response.Output returned by querying data handler. Optional len value can also be specified for output type of arrays to check for min length of array.
- Famark.setFocus(field): sets current focus (cursor) to the specified field on the form.
- Famark.setDefaultFocus(): sets current focus (cursor) to the topmost editable field on the form.
- Famark.makePipeInput(field, entity, dispAttr, sysAttr, filter): can be used with multiline field to create a pipe separated list of values of system name of the given entity.
- Famark.getTimezoneOffset(): returns the timezone offset for the client.
- Famark.getIsoDateTime(dtType,val): returns ISO format value for the datetime value, with dtType being datetime, date or time.
- Famark.getDisplayDateTime(dtType, val): converts ISO datetime to display format.
- Famark.refreshCaptcha(): for custom forms that has captcha enabled this function can be used to refresh captcha.
Further there are some array functions that can operate on multiple fields passed as an array of string; these include:
- Famark.disableFields(fieldsArray): disables all the fields passed.
- Famark.enableFields(fieldsArray): enables all the fields passed.
- Famark.showFields(fieldsArray): shows all the fields passed.
- Famark.hideFields(fieldsArray): hides all the fields passed.
- Famark.requireFields(fieldsArray): shows and makes required all the fields passed.
- Famark.ignoreFields(fieldsArray): hides and makes not required all the fields passed.
- Famark.setWorking(false): disables forms user changed state that prompts user before closing the form, used when field values are set by script on form load.
- Famark.makeSelect(field, optionsArray): converts a text input field into a select dropdown with the specified options array.
- Famark.makePassword(field): converts a text input field into a text password field.
- Famark.disableAllFields([optionalExceptFieldsArray], [color]): disables all fields in the form except the fields specified as exceptFields array.
Besides using MainForm one can also create custom forms configuring the columns, formatting and data filter.
Form Fields
- SystemName of the form.
- DisplayName of the form.
- The entity for which form is being created.
- Form Field Names containing pipe separated list of Attribute Names to be shown in form.
- Include Captcha adds captcha to the form
- Form Type (Basic/Custom) when basic is selected the form is auto constructed with the given fields in a linear form, like other default forms but only containing the fields defined in the form Fields. When Custom Form Type is selected then a specially formatted html needs to be provided in the Custom Form Format field.
- Form Style Url allows providing custom css file for style of the form.
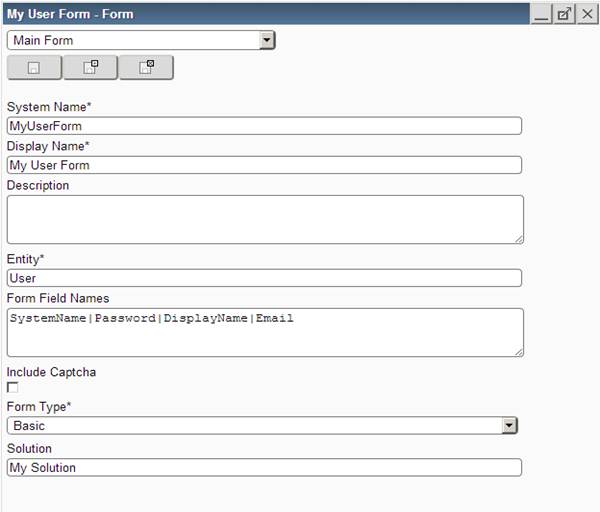
The above screen shows creating a form for "User" entity that contains only four of its fields.
Famark reporting feature provides a basic JavaScript library for creating standard charts. However considering the need of reports being very specific to the business need the feature provides complete flexibility but requires basic knowledge of HTML and JavaScript to create reports on Famark.
The action that is mostly used for getting data for reports is RetrieveStats that can be triggered through Data handler. The RetrieveStats action performs aggregation over the field to be grouped by and then aggregation function to be performed on specific fields that will become the series for the report.
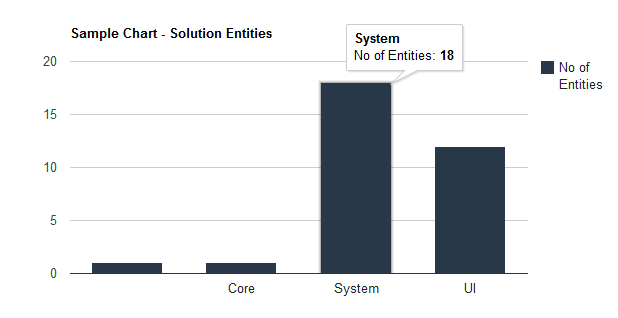
The following example shows configuring a chart to show number of entities in each solution. This requires grouping all the entities by the solution id and showing there count as a series. The corresponding Data Handler Url does the same:
Data.ashx?entity=System_Entity&groupBy=Get_Text_SolutionId&columns=Get_Count_System_EntityId&labels=No+of+Entities
With entity specifying the entity on which RetrieveStats action will be run groupBy specifying SolutionId as the column for grouping further Get_Text prefix to SolutionId field enables showing the display name of the solution instead of their id further columns containing Get_Count_System_EnitityId (note System_EntityId is the primary column of the System_Entity entity) specifies the series with the aggregation function and to be performed on which column.
The following screen shows the complete html and the script for this chart:
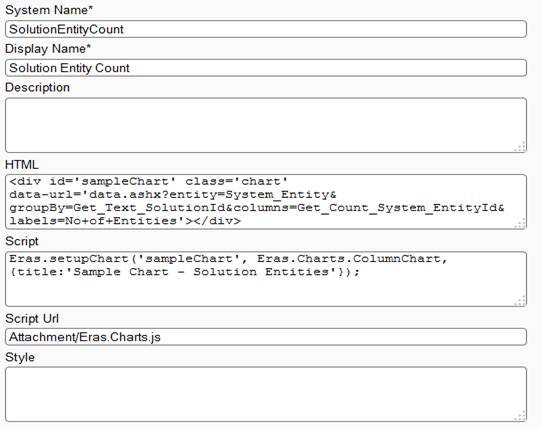
The Famark.setupChart function uses the data-url specified in the html that contains the url of the data handler responsible for retrieving the data for the chart. Famark.setupChart function takes three arguments first the id of the div to be converted into a chart, next the type of the chart. The possible chart types include:
- Famark.Charts.PieChart
- Famark.Charts.LineChart
- Famark.Charts.AreaChart
- Famark.Charts.SteppedAreaChart
- Famark.Charts.ColumnChart
- Famark.Charts.BarChart
Also the third parameter being an option object that can specify additional information for the chart like the title for the chart etc.; an example option object is shown below
{title: "My Chart", colors:["#ff0000", "#00ff00", "#0000ff"], is3D: true}
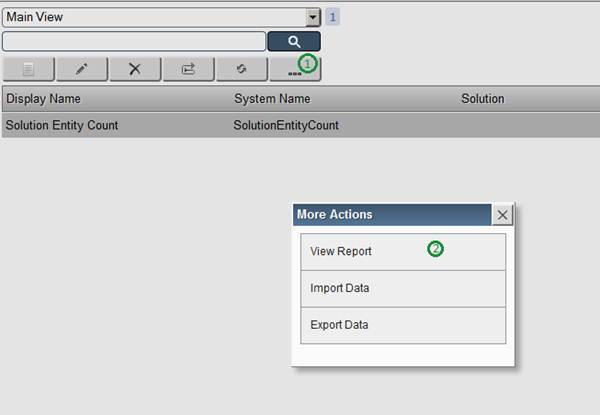
The above chart can be generated from the View Report action in more action option of the Reports entity.
And the generated report can be seen as follows:
Note: Famark reports uses the generic plot handler which can be used with any entity that has such fields as HTML, Script etc. So the Url of the above rendered report is:
https://www.famark.com/MyDomain/Plot.ashx?data-entity=UI_Report&data-rid=<recordid>
with data-entity being the system name of the entity (which in case of reports is UI_Report) and data-rid being the record id.
Following is the list of aggregate functions that can be performed:
- Get_Count_FieldName
- Get_Sum_FieldName
- Get_Max_FIeldName
- Get_Min_FIeldName
- Get_Avg_FieldName
- Get_StdDev_FieldName
Note: The Famark charting library is a pure JavaScript library with html5 SVG rendering capability, however if desired this library can be replaced with other JavaScript charting library by change the Script Url to point to other library.
Join Famark Community!
Famark community is a social platform for creative and innovative professionals from different domains.
Join Community
![]()
![]()
![]()
![]()